Logging your harvest right after a successful hunt can be the difference between a clean record and a costly mistake.
If you miss a detail—like the exact GPS point or the species code—you might end up with a paperwork headache later. A quick, accurate log keeps you compliant and helps you track patterns for future trips.
For a quick run‑through of the steps, check out the Step by Step Hunting Regulations guide that walks you through tagging, photographing, and entering data on the HuntScout app.
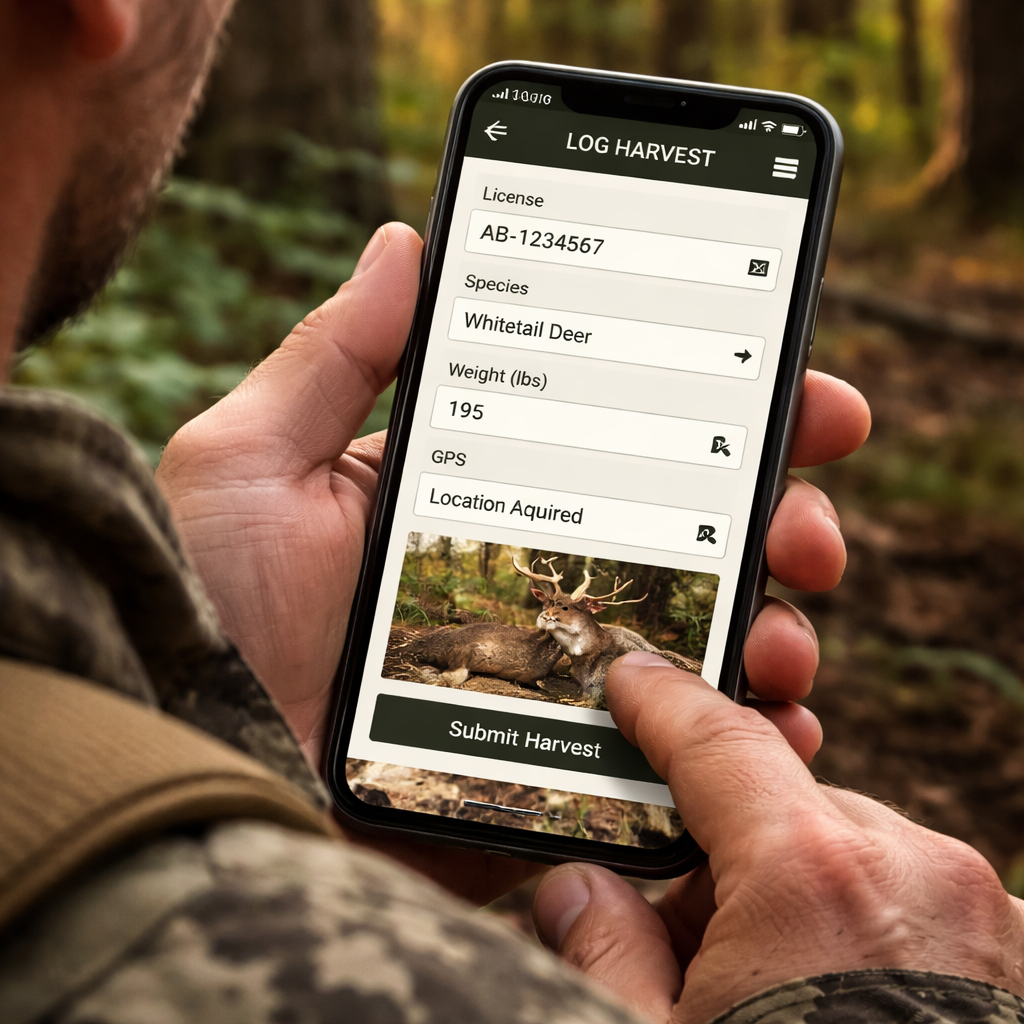
Start by snapping a clear photo of your tags and the animal’s location. Then open the app, tap “Add Harvest,” and fill in the species, weight, and GPS coordinates. Save the entry before you move on, and the app will sync it to your account for offline access.
Want to see how tech can boost other parts of your hunting workflow? Read How to Master AI Video Editing for Social Media for a simple guide.
Step 1: Set up your hunting app profile
First thing you do after installing the app is create a profile that actually works for you.
Open the app, tap Profile, and add your name, licence number, and hunting units. The app then filters maps and alerts to only the land you can hunt.
Why bother? A correctly set profile saves you from scrolling through irrelevant data when you’re trying to log a harvest.
Step‑by‑step checklist
- Enter licence and expiry.
- Pick provinces or states.
- Set default weight unit.
- Turn on push alerts.
Got a weird tag? Tap Add Custom Field, type it in, and the app will keep it for later harvest logs.
Now you’re set to log a harvest. After a buck, open Add Harvest; your profile auto‑fills species and WMU.
Does it feel clunky? Not if you set up shortcuts. HuntWise lets you pin your most used species to the home screen, so you can tap it and skip the scroll.
Quick tip from HuntWise: pre‑save common tags as templates, then pick the right one after the shot. Saves paperwork and keeps you compliant. Read more in the HuntWise quick tips guide.
Before you head out, download offline maps for your chosen hunt area. Tap Settings > Offline Maps, select the region, and hit Download. This ensures you can log a harvest even where cell service dies.
Finally, double‑check that your profile’s privacy settings let you share harvest data with the province if required. A quick toggle saves you a call to the regulator later.
With these steps done, logging your harvest becomes a habit, not a hassle.
Step 2: Access the harvest logging feature
Open the harvest logging feature in your hunting app. Tap Harvest, then Add Harvest to start a new entry. If your profile is set up, the app will auto-fill fields like species and WMU.
Double-check the essentials. Make sure the species is right, the weight is in your preferred units, and the GPS point is as precise as you can get. If you shot near a boundary, the WMU shown on screen helps you stay legal.
Add the photo you snapped of the tags or animal, and drop in notes from the moment. Photos plus notes make your log far more useful when you look back. You can add more than one photo to capture different angles.
Save the entry. The log sits in the app and syncs when you have service. You can log while offline and push the data to the cloud later.
A quick example from TrophyTracks shows how a harvest log stays rich across seasons—photos, notes, and a place to store memories. TrophyTracks also turns logs into movement heat maps and offers a 7-day outlook to plan the next hunt. TrophyTracks helps you build a robust harvest journal you can rely on later.
What about logging in rough conditions or in areas with no service? Dive Bomb Industries notes that GPS map apps let you log and track even offline. Dive Bomb Industries offers practical tips on offline maps and field logging. Dive Bomb Industries provides actionable guidance for field logging.
Step 3: Enter harvest details
Now that you’ve opened a new harvest entry, it’s time to fill in the details.
Tap the species name and type the weight. Switch between pounds and kilograms, whichever you use. If you’re unsure, enter an estimate; you can edit it later.
Drop a pin on the map. The GPS will drop a dot where you stood. If it’s off, drag it a few meters to line up with a rock or tree you recall.
Add a photo of the tags and a quick side shot. You can attach more than one picture, so capture front and side if you like.
Write short notes. Note age class, sex, any odd markings, weather, wind, and whether you used a stand or blind. This helps you see patterns next season.
Tip: use shortcuts for common tags. A “save as template” button lets you reuse frequent entries and skip typing.
When you’re done, hit Save. The entry stays in your offline queue if you’re out of service, then syncs when you’re back online.
Finally, glance over the log before you pack up. A quick check catches missing fields and lets you snap a last minute photo.
Doing this each hunt turns a vague memory into a solid record you can trust.
Later, you can pull a report of all your entries. Seeing weight trends or location clusters helps you pick better spots next year.
If the app lets you add custom fields, set one for trophy size or antler spread. That way the data stays consistent across hunts.
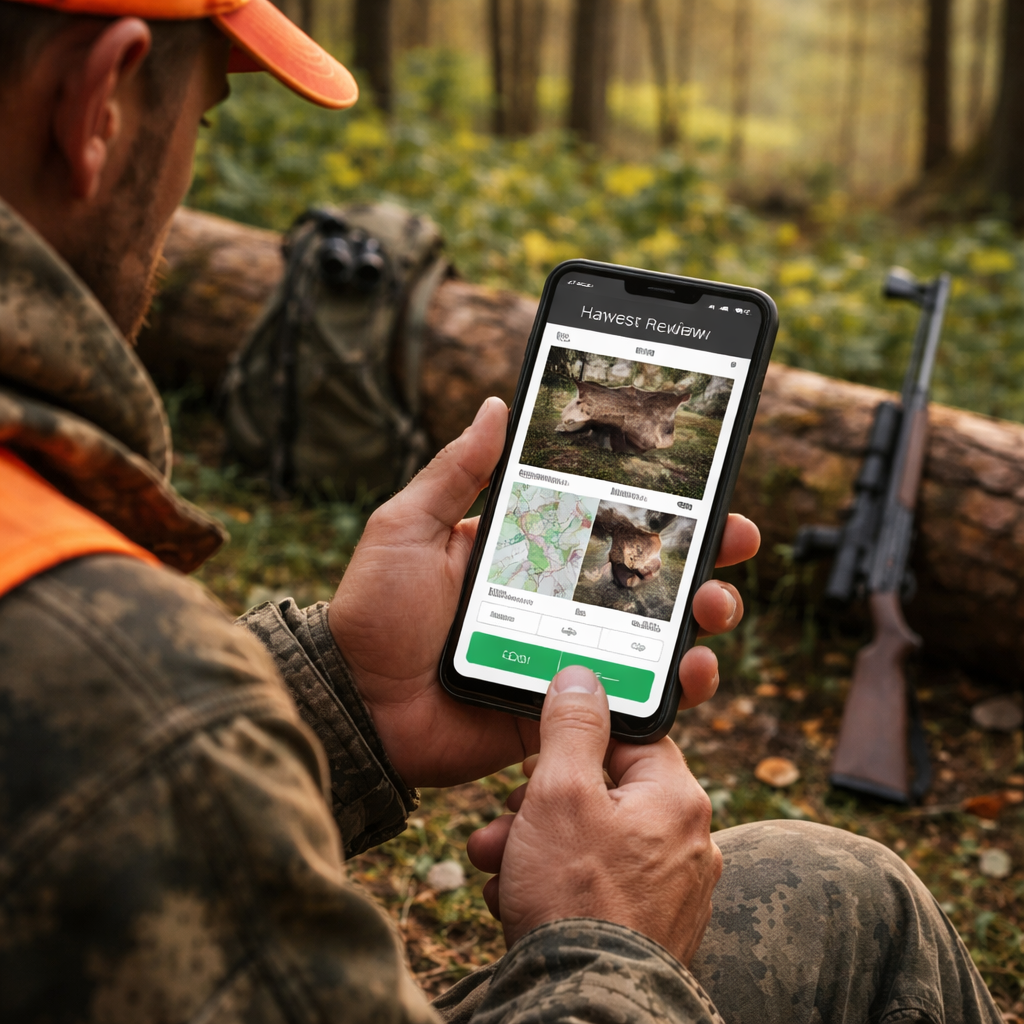
Step 4: Attach evidence and compare options
Now that your basic info is saved, it's time to add proof and see which option works best for you.
First, snap a clear photo of the tags. The app will tag the image with the date and location automatically. If the shot is blurry, just tap the photo and replace it, a quick redo saves you from a mess later.
Second, consider attaching a short video or a series of photos that show the animal from different angles. Some hunters like to record the whole bag-out scene; the extra visual cue can help officials verify your haul if questions come up.
Third, use the built-in GPS marker. Most hunting apps let you lock the exact coordinates to the entry. Compare that to the map view, if the point lands on a boundary line, you might need to adjust the pin before you finish.
So, which evidence should you trust most?
| Evidence type | How it's added | Why it helps |
|---|---|---|
| Photo of tags | Take picture, app tags date/GPS | Shows legal tag numbers at a glance |
| Multi-angle shots | Attach 2-3 photos or short video | Gives context if the animal looks different in one view |
| GPS lock | Press “Pin location” before saving | Confirms you were inside the right WMU |
When you compare these options, pick the one that feels easiest and most reliable for the hunt you just finished. If you have strong cell service, a quick photo may be enough. In remote spots, the GPS lock becomes your safety net.
Finally, glance at the summary screen. The app will list any missing evidence, maybe a photo or a note. Fill those gaps now, because editing later can be a pain.
Once everything checks out, hit “Submit” and you’ve nailed how to log harvest in hunting app with solid proof that you can rely on next season.
Step 5: Review, sync, and share your harvest record
Now that you've added all the proof, it's time to give your entry one last look.
Tap the summary screen and scan for any empty spots. A missing photo or a blank note is easy to fix now, before you pack up. Just tap the field, snap a quick shot, and hit save.
Next, make sure the app syncs your data. If you're still in the woods, the record sits in the offline queue. As soon as you get back into range, hit the sync button and let the cloud store a copy.
Why stop there? Most hunting apps let you share a PDF or a simple link with the wildlife agency. Send that file right from the app, or email it later from your phone. Keeping a personal backup on your own device never hurts.
For a second opinion, you can log the same entry in a general harvest journal like Harvesta. It lets you add pictures, GPS points, and custom tags all in one place. Harvesta supports offline work and iCloud sync, so your data stays with you. Harvesta
If you hunt with more than one phone or tablet, turn on iCloud sync in the settings. That way a change you make on the trail shows up on your home computer, and you can pull a full report whenever you need it.
When everything checks out, hit “Submit” and you’ve locked in a clean, share ready record. You’ll sleep better knowing the paperwork is done and the proof is solid for next season, for the upcoming season.
Conclusion
Logging your harvest right after a hunt keeps your record clean and saves you from paperwork headaches later.
When you snap a photo, drop a pin, and add a quick note, you create a solid proof file you can share with the agency or keep for yourself. A few taps on the app do all the heavy lifting.
So, what’s the next step? Open your hunting app tonight, pull up the last entry, and double check the GPS and photos. Hit “Submit” and let the sync do the rest.
Remember, a habit of immediate logging means you’ll always have a reliable harvest log, and you’ll sleep easier knowing everything is in order for the next season.
If you hunt with a group, ask each person to log their own record. That way you get a full picture of the day and can compare notes later. A quick review before you pack up catches any missing info and avoids a rush back to the phone.
FAQ
What’s the first thing I should do when I open the harvest screen?
When you tap Add Harvest, the app usually pulls your profile info. Check that the species name matches what you shot, then look at the weight field. If you’re not sure of the exact weight, type an estimate, you can edit it later. A quick glance at these core fields stops you from having to go back later.
How do I make sure the GPS location is accurate?
The phone’s GPS can drift a few meters, especially under heavy tree cover. After the app drops a pin, zoom in on the map and move the pin to the nearest visible landmark, a rock, a tree, or a trail marker. When you’re happy with the spot, lock it in before you add a photo. This way the record shows exactly where the animal was.
Do I need a photo of the tags, or is a single picture enough?
A clear tag photo is the safest proof. Snap the tag front and back if you can; a second shot of the animal’s side helps if officials ask for size or antler details. The app lets you attach several pictures, so add the extra shot and then delete any blurry ones. More photos cost no extra time.
Can I edit a harvest entry after I’ve submitted it?
Yes, most hunting apps let you open a saved entry and tap Edit. Change the weight, add a missing photo, or move the GPS pin if you notice an error. Just remember to hit Save again so the changes sync when you get back online. Editing keeps your log tidy without starting a new record.
What’s the best way to share my harvest record with the wildlife agency?
Many apps generate a PDF or a shareable link right from the summary screen. Tap the Share button, choose Email or Save to Files, and send it to the agency’s address. If you need a hard copy, print the PDF later. Having a ready to send file cuts the back and forth if they ask for proof.
How often should I back up my harvest data?
Sync your app whenever you have signal, the cloud copy is the safety net. It’s also a good habit to export a CSV or PDF at the end of each hunting season and store it on a personal drive or external hard drive. A quick backup means you won’t lose years of data if your phone dies.